<<  |  Home  |  >>

Showing posts with label patterns. Show all posts

Thursday, June 15, 2006

Listen to this post as an mp3 file (for posts after 3/6/06)
Free Arrowhead Lace Headband Pattern

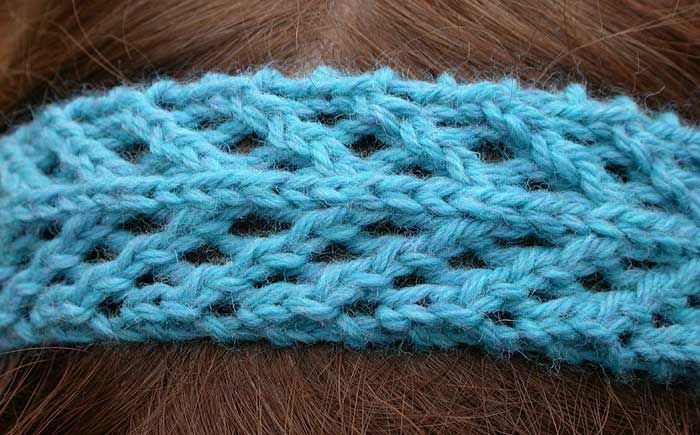
As I mentioned in my last post, making the Saving Grace headband has inspired me to look through my pattern books for other potential lace patterns that would work well with a worsted weight yarn for a quick headband. This turned out to be a bit more difficult than I anticipated. The use of worsted weight yarn meant that I needed to keep the pattern under 14 stitches so the headband did not become uncomfortably wide. I swatched a few options, but the headband below is the most successful one so far.

This headband is based on the Arrowhead Lace pattern stitch in Barbara Walker's A Treasury of Knitting Patterns. It has a tendency to poof up in the middle (I didn't bother to block it), but it seems to flatten out when worn. Here's the pattern.

Arrowhead Lace Headband

click for bigger picture

YARN

Cascade 220 [100% wool],
color: 9455 (turquoise heather)

NEEDLES

US 7

GAUGE

approximately 5sts/inch

DIRECTIONS

Cast on 11 sts.

Follow the arrowhead lace pattern (using chart or directions below) until the headband is approximately 16 inches long (or long enough to fit around your head when slightly stretched). Bind off and seam ends together.

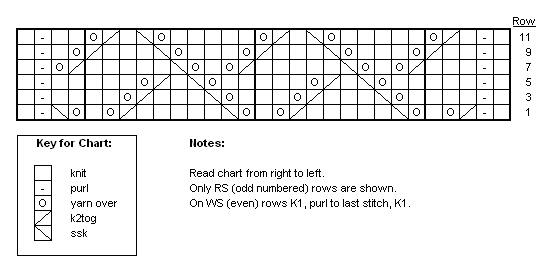
Arrowhead Lace Chart

Arrowhead Lace Directions

Row 1 (WS):k1, p9, k1.

Row 2 (RS):k1, yo, ssk, yo, ssk, k1, k2tog, yo, k2tog, yo, k1.

Row 3:same as row 1.

Row 4:k2, yo, ssk, yo, slip 2 together as to knit--k1--pass the 2 slipped sts over, yo, k2tog, yo, k2.


click for bigger picture


Pattern & images © 2006 Tamara Stone-Snyder.
May be distributed freely for personal use only. Cannot be reprinted on the web or otherwise without permission.

23 comments:

Wednesday, February 08, 2006

Listen to this post as an mp3 file (for posts after 3/6/06)
Anatomically Correct Sock Toes

look at that huge toeI have long big toes, and when I'm making socks I like to shape the toe area to fit my foot "like a glove" (well really "like a sock", but you know what I mean). Yes, this does mean that you have to pay a bit more attention when you put on your socks (to make sure they are on the right foot), but hey, if you can do it with shoes, you can do it with socks.

I developed these instructions through trial and error, but I now use them for all of the socks I make for myself. I hope my fellow large-big-toed knitters will find this helpful.

Anatomically Correct Sock Toes
(for Top-Down Socks)

NOTES:

These directions are for use with typical sock-weight yarn. You may have to reduce the number of rounds in each section for use with heavier yarn. [However, I just used these directions for my Log Cabin Socks, which were made with a bulky weight yarn on US6 needles and they worked out fine.]

For ease in writing these instructions, I will be assuming that you are using 3 DPNs, arranged like this:

I will also be assuming that you have:

  • 1/4 of your stitches on needle 1,
  • 1/2 of your stitches on needle 2, and
  • 1/4 of your stitches on needle 3

*** I will be referring to the point between needle 1 and needle 3 as the end of the round. If you are using 2 circulars (as I usually do), just consider the end of the round to be at the middle of the bottom-of-the-foot needle.

As you are knitting the foot of your sock, keep trying it on (put stitches on a piece of scrap yarn, if necessary) and stop when your sock reaches the base of the toenail of your little toe (basically the point at which the width of your foot starts to decrease). WRITE DOWN how many rounds you have knit on the foot so far. This will be useful information for the 2nd sock. Skip this step, and regret it later (I know I usually do.)

TOE AREA OF LEFT SOCK

Start Little Toe Decreases:

[Basically, here you are decreasing every other row, but on the little-toe side only.]

Round 1:
Needle 1 - Knit.
Needle 2 - K to last 3 sts, K2tog, K1.
Needle 3 - K1, SSK, K to end.
Round 2:
Knit.

Repeat these two rounds 7 times, and then repeat Round 1 once more (so 15 rows total). [The sock should now reach approximately to the tip of your middle toe. If not, adjust accordingly, but end with a decrease round.]

Start Big Toe Decreases:

[Basically, here you start decreasing on the big-toe side (at first every other row, then every row). Also, you switch to decreasing every row on the little-toe side.]

Round 1:
Needle 1 - K to last 3 sts, K2tog, K1.
Needle 2 -- K1, SSK, K to last 3 sts, K2tog, K1.
Needle 3 - K1, SSK, K to end.
Round 2:
Needle 1 - Knit.
Needle 2 - K to last 3 sts, K2tog, K1.
Needle 3 - K1, SSK, K to end.
Rounds 3, 4, & 5:
Repeat Round 1.
Round 6 (partial round):
Needle 1 - Knit.

excuse my pillingGraft the toe stitches together. [I find it easier to graft the sock closed fairly loosely and then go back and tighten the stitches one by one, working the extra yarn toward the loose end.]

Pull the yarn tight at the end (to eliminate any bumpiness at the end of your grafting) and weave the end in.

TOE AREA OF RIGHT SOCK

Oh, bother. I'm tired. Can't I just take the easy way out and say, "reverse the shaping?"

Fine, here it is, reversed for your second sock pleasure.

Start Little Toe Decreases:

Round 1:
Needle 1 - K to last 3 sts, K2tog, K1.
Needle 2 - K1, SSK, K to end.
Needle 3 - Knit.
Round 2:
Knit.

Repeat these two rounds 7 times, and then repeat Round 1 once more (so 15 rows total).

Start Big Toe Decreases:

Round 1:
Needle 1 - K to last 3 sts, K2tog, K1.
Needle 2 -- K1, SSK, K to last 3 sts, K2tog, K1.
Needle 3 - K1, SSK, K to end.
Round 2:
Needle 1 - K to last 3 sts, K2tog, K1.
Needle 2 - K1, SSK, K to end.
Needle 3 - Knit.
Rounds 3, 4, & 5:
Repeat Round 1.
Round 6 (partial round):
Needle 1 - Knit.

Graft toe stitches together and weave in end.


Leave me a comment if you have any questions. If you actually make these, let me know how they turn out.


Pattern & images © 2006 Tamara Stone-Snyder.
May be distributed freely for personal use only. Cannot be reprinted on the web or otherwise without permission.

49 comments:

Monday, January 23, 2006

Listen to this post as an mp3 file (for posts after 3/6/06)
Free Zigzag Lace Scarf Pattern

I wrote up the pattern for the red lace scarf I recently made with Araucania Nature Wool Chunky. I thought I would share it with you. The lace pattern is my variation of one I found in Beautiful Knitting Patterns by Gisela Klopper. It is also somewhat similar to the Flemish Block Lace pattern in Barbara Walker's A Second Treasury of Knitting Patterns.
Here it is. Enjoy!

Zigzag Lace Scarf

lace scarf

FINISHED SIZE

About 7.5" wide and 72" long (after blocking).

YARN

2 skeins Araucania Nature Wool Chunky (100% wool; 131yd/120m per 100g hank), color: 104, dark red

NEEDLES

US #10 (6mm)

NOTIONS

Tapestry needle

GAUGE

Not critical, but mine was approximately 15-16 sts = 4" in stockinette stitch

NOTE

This scarf is worked in two identical sections, from the ends to the center back, where the two sections are grafted together. If you want to avoid grafting, just repeat the lace pattern to make the scarf as long as you want, then end with 4 rows of seed stitch and cast off loosely.

DIRECTIONS FOR SCARF HALF

(Make two)
CO 29 sts.
Row 1 (RS):k1, [p1, k1] repeat to end of row.
Rows 2-4:Repeat row 1.
Begin lace pattern, following either the written instructions or the chart.

Lace Pattern Written Instructions

Row 1 (RS):k1, p1, k2tog, yo, k, [yo, ssk, k5, k2tog, yo, k] twice, yo, ssk, p, k.
Row 2 (and all even rows):k1, p to last st, k1.
Row 3:k1, p1, k3, [k1, yo, ssk, k3, k2tog, yo, k2] twice, k2, p1, k1.
Row 5:k1, p1, k3, [k2, yo, ssk, k1, k2tog, yo, k3] twice, k2, p1, k1.
Row 7:k1, p1, k3, [k2tog, yo, k1, yo, ssk, k5] twice, k2tog, yo, p1, k1.
Row 9:k1, p1, k2, k2tog, [yo, k3, yo, ssk, k3, k2tog] twice, yo, k1, p1, k1.
Row 11:k1, p1, k1, k2tog, yo, [k5, yo, ssk, k1, k2tog, yo] twice, k2, p1, k1.
Row 12:k1, p to last st, k1.

Lace Pattern Chart

lace chart
Complete rows 1-12 of the lace pattern a total of 13 and a half times, ending with row 6.
Final row (a variation of row 7 of the lace pattern):k1, p1, k3, [k3, yo, ssk, k5] twice, k2, p1, k1.
Do NOT bind off. Place these stitches on a holder or a piece of scrap yarn.
Cast on 29 sts and knit the second half of the scarf exactly as the first half.

FINISHING

Graft the two halves of the scarf together using kitchener stitch. Weave in loose ends. Wash in cool water and block by pinning to a flat surface. Let dry.

Pattern & images © 2006 Tamara Stone-Snyder.
May be distributed freely for personal use only. Cannot be reprinted on the web or otherwise without permission.

68 comments:

Newer Post >> << Older Posts Home